Double Z Fold Card (YouTube tutorial available)


Double Z Fold Card     

Check out the YouTube Tutorial here

Main body Lemon Lime Twist 11 x 4½, scored at 2¾ & 5½
Strip 11 x 1¼, scored at 2¾ & 5½ and the largest die from Nested Essentials
Basic White next layer down and the inside piece 2⅝ x 4
DSP (I used Friends of the Ocean) 2 pieces 2½ x 4 and 1 piece 2⅝ x 4
Fussy cut some images from the sheet of lager images
Greeting With You in mind
Ink Melon Mambo
Teat & Tape
Sunny Day Iridescent Dots


Cut and Flip Card (YouTube tutorial available)


Cut and Flip Card    

Check out the YouTube Tutorial here

Main body Balmy Blue 11 x 4¼, scored at 5½ and cut at 2¾
DSP (I used Otterly Adorable) 6 x 4, cut at 2½
Basic White 1¾ x 4 place a small piece (2¼ x ⅜) for greeting
Pretty Peacock, small piece to die cut the banner
Stamps Friends for Life
Dies Stylish Shapes
Ink Pretty Peacock
Riverside Irregular Pearls
Dimensionals


Quick and Easy Gift Card Holder (YouTube tutorial available)


Quick and Easy Gift Card Holder

Check out the YouTube Tutorial here

Main body Basic White 11 x 4¼, scored at 5½. Split the front from the score line at 1⅝. Cut the largest circle using Stylish Shapes
DSP (I used Take a Bow) Top: 5⅝ x 2½ Bottom" 5⅝ x 1½
A Little Bit Festive Wreaths, glued onto the Basic White Circle
Seal the edges of the bottom to form a pocket
Stamps One of a Kind
Ink Real Red & Garden Green
Drusy Embellishments
Dimensionals

Cascading Waterfall Card (YouTube Tutorial available)


Cascading Waterfall Card (see the picture of each step below)

Check out the YouTube Tutorial here

Main body Smokey Slate 5½ x 4¼
Waterfall strip 8½ x 1¾, scored at 4¾, 5¾ & 6¾
3 pieces 2 x 2¼
Basic White 3 pieces 1⅞ x 2⅛ plus 4⅝ x 1
Pool Party 5¼ x 4
Basic Grey bar 1 4¼
Stamps Friendly Seagulls
Ink Memento Black, Stampin' Blends: Pool Party, Light and Dark Smokey Slate, Light Daffodil Delight, Light Crumb Cake
Black & White Gingham Ribbon 2"
Trio Gems
Tear & Tape

As the ribbon is pulled, this is how the images reveal


Corner Pocket Gift Card Holder (YouTube tutorial available)


Corner Pocket Gift Card Holder

Check out the YouTube Tutorial here

Main body Real Red 8½ x 5½, scored at 4¼ and 1" circle, cut in half
DSP (I used Iconic Celebration) 6 x 6 See template for cutting pattern
Basic White 3¼ x 5½, scored at 1¼, 4⅛ x 5⅜, 2¼ x 2¾
Mossy Meadow 4⅛ x 5⅜ cut diagonally
Stamps Hang an Ornament and Peaceful Season
Ink Real Red & Mossy Meadow, Smokey Slate Light Stampin' Blends
Tombow Mono Liquid Glue
Dimensionals

Template for 6 x 6


Floating Front Vertical Easel Card (YouTube tutorial available)


Floating Front Vertical Easel Card

Check out the YouTube Tutorial here

Main body Melon Mambo 8½ x 5½, scored at 4¼ and 2⅛ floating front piece 2¾x2¾ and 2 squares 2x2, scored diagonally
Pumpkin Pie 2 pieces 2 x 5⅜ and easel piece 1½ x 5⅜, scored at ½"
DSP (I used Friends of the Ocean) 2 pieces 1⅞ x 5¼ and a strip for the easel ⅝ x 5⅜. The crab was fussy cut from a sheet with larger images
Basic White inside layer 4 x 5⅜, front 2⅝ x 2
Stamps Simply Said
Ink Melon Mambo
Tear and Tape
Sunny Day Iridescent Dots
Dimensionals

Free Shipping Days December 9-11


Whoo hoo, Free Shipping Days!

Place a qualifying order and get free shipping.  
You can find the link to my online store here

Please be aware however, that due to the popularity of this offer, Stampin' Up! can't guarantee delivery before Christmas

Pop Up Pocket Gift Card Holder (YouTube tutorial available)


Pop Up Pocket Gift Card Holder

Check out the YouTube Tutorial here

Main body Real Red 11 x 4¼, scored at 3¾ and 9¼
Basic White 4 x 3½ and 4 x 2¾
Inside Pocket Granny Apple Green 7 x 3½, scored at ½ and 5
DSP (I used Take a Bow) 4 x 1½ (front), 3¼ x 1¾ and 3¼ x 3¼ (pocket)
A Little Bit Festive Pack for the punch out images
Iconic Imagery for the inside greeting
Peaceful Season stamps and dies to cut the 2 Christmas layers and stamp Happy
Inks Real Red and Granny Apple Green
Tear & Tape and Tombow Mono Liquid Glue
Iridescent Adhesive Backed Gems
Dimensionals

Dahlia Card (YouTube tutorial available)


Dahlia Card

Check out the YouTube Tutorial here

Main Body Petunia Pop 8½ x 5½, scored at 4¼
Basic White 4 x 5¼ for the front, 3½ x 4¼ (1/6 of a sheet) for inside, and 1 x 2" circle
DSP (I used Unbounded Beauty) 12 x 4 - punch/die cut 8 x 2" circles
Fold the circles as shown in the template below
Stamps Iconic Imagery
Ink Petunia Pop
Faceted Gems Trio Pack

The red card uses Real Red cardstock, Take a Bow DSP and Garden Green Ink. The centre is made with a small circle of red glimmer paper.

Circle Folding Template


Fold Back Z Fold Style 12 x 12 Card (YouTube Tutorial available)


Fold Back Z Fold Style 12 x 12 Card

Check out the YouTube Tutorial here

Main Body Granny Apple Green 4¼ x 5½, inside 2½ x 5
DSP (I used Reindeer Days) 10½ x 5¼, scored at 1, 3¾ * 6½
Garden Green Stylish Shapes large banner
Basic White 2¼ x 4¾, 2¾ x ¾ for the banner
Stamps Peaceful Season
Ink Garden Green

3 Panel Thanksgiving Card (YouTube tutorial available)


3 Panel Thanksgiving Card

Check out the YouTube Tutorial here

Main body Very Vanilla 10½ x 4¼, scored at 1¼, 4 & 6¾. 2 pieces for the greetings 2  x 1
Back panel Cajun Craze 4¼ x 5½ 2 pieces for the greetings cut with Stitched Rectangle dies 2¾ x 1¼
DSP (I used Sweet Days of Autumn) 1 x 4, 2½ x 4 & 3½ x 4
Stamps Iconic Imagery
Inks Cajun Craze and Mossy Meadow

Christmas Everywhere Kit


This is one of my most favourite kits ever.  The kit alone is fabulous but the potential for expanding it with some additional cardstock is amazing!

If you're interested in getting your hands on a kit (or 2 or 3) this link will take you directly to this particular kit in my online store


Locking Front Card (YouTube tutorial available)


Locking Front Card

Check out the YouTube Tutorial here

Main Body DSP (I used Nests of Winter) 11 x 5½, scored at 1¼, 5½ & 9¼
See below for important template instructions

Basic White for the inside 3½ x 4¼ and 2 circles cut using Deckles Circle Dies
Early Espresso for 2 circles, layered slightly larger also cut from Deckles circles
Stamps One of a Kind
Ink Early Espresso
Various images fussy cut from one of the sheets of DSP
Dimensionals

Important scoring information

In order for the finished card to fold with these score lines, you need to have the inside pattern of the DSP facing up and the dominant outside pattern be facing down (unseen) as you score.
OR
If your DSP design has an orientation, have the outside pattern facing up but you must turn your DSP around so the bottom of your paper touches the TOP of the trimmer/scorer

Paper Pumpkin November 2024 Alternatives (YouTube tutorial available)


Paper Pumpkin November 2024 Alternatives

Check out the YouTube Tutorial here

Card 1
Basic White 8½ x 5½, scored at 4¼ & a banner cut using Stylish Shapes
Embossed with Snowflake Sky
DSP (I used Nests of Winter) 4 x 5¼ with a ¾ border window cut out
Kit tag, ornament and gold foil topper
Ink Poppy Parade
Dimensionals

Card 2
Pool Party 8½ x 5½, scored at 4¼
DSP is the middle of the frame cut out of Card 1 3¾ x 2½
Basic White 1½ x 2, banner cut at the bottom
Kit ornament and gold foil topper
Gold cord
Stamps Peaceful Season
Ink Shaded Spruce
Iridescent Adhesive-backed Discs
Dimensionals

Flap Top Gate Fold Card (YouTube tutorial available)


Flap Top Gate Fold Card

Check out the YouTube Tutorial here

Main Body Lost Lagoon 8½ x 11, scored across at 5½
At 2  at both sides, CUT UP from the score line, and on one side SCORE DOWN from the score line
Using scissors, cut off the 2 flaps on the top section
In the bottom section, fold the scored side into the middle and fold the other side over to meet it fully in the middle.
DSP (I used Otterly Adorable) 3 pieces each 4 x 5¼. Cut 2 of the pieces in half making 4 strips 2 x 5¼
The full piece of DSP goes on the front and the 2 sets of strips go on either side of the gate folds.
Basic White 4 x 5¼ for the inside
Cut a banner using Stylish Shapes dies from Lost Lagoon and a small piece of Basic White ¾ x 1¾ for the greeting
Stamps Otterly Adorable and Simply Said
Inks Calypso Coral, Lost Lagoon & Pretty Peacock
Dimensionals

Triple Flap Double Gate Fold (YouTube tutorial available)


Triple Flap Double Gate Fold   

Check out the YouTube Tutorial here

Main body Garden Green 11 x 5¼, scored at 1¾ and 3½ at each end, 3 strips 4 x 1¾
Real Red 4¼ x 5½ for the back, front panel 2⅝ x 4
Basic White 3¾ x 5 for inside and 2⅜ x 3¾ for the front panel
DSP (I used a sheet from A Little Bit Festive) 3 pieces 3¾ x 1½ and one of the die punch outs
Dimensionals

Inside Slider Card (YouTube tutorial available)

Inside Slider Card

Check out the YouTube Tutorial here

Main body Bubble Bath 11 x 4¼, scored at 5½
6x6 sheet of DSP cut as shown on the template below
DSP (I used Delightful Floral) 4½ x 4, 1½ x 4 & 5½ x 2
Basic White 5¼ x 3⅞, 2¾ x 2½ and 8½ x ⅞, scored at ½ and 4½
Berry Burst 3 x 2¾
Stamps Simply Said
Ink Berry Burst
Purple Fine Shimmer Gems
Dimensionals

Christmas version
Cardstock Real Red and Garden Green
DSP Take a Bow
Stamps Hang an Ornament and Peaceful Season
Ink Real Red and Garden Green
Iridescent Rhinestones


Corner Pocket Card (YouTube tutorial available)


Corner Pocket Card  

Check out the YouTube Tutorial here

Main Body Garden Green 8½ x 5½, scored on one side at 2⅛ then fold the opposite side over to make an even join. Front panel 5¼ x 4, scored at 2 - the fold goes on the right  Small square 2⅛ x 2⅛ cut diagonally
Basic White 2 pieces 2⅜ x 3¾ and an extra piece to stamp the ornament
DSP (I used Take a Bow)  4 x 5¼, 2⅛ x 5¼ and a small square 1 x 1⅞ cut diagonally for the pocket. I happened to have a small strip so added to the inside.
Stamps Peaceful Season and Hang an Ornament, plus the dies
Ink Real Red, Garden Green, and Smokey Slate Light Stampin' Blends
Dimensionals

Exploding Gate Fold Card (YouTube tutorial available)


Exploding Gate Fold Card

Check out the YouTube Tutorial here

Main Body Summer Splash 8½ x 5½, scored on one side at 2⅛ then fold the opposite side over to make an even join
DSP (I used Unbounded Beauty) 
8 x 4, scored at 2 & 6. Then following the template below, fold the diagonals
4 x 5¼, cut in half for the front, matching any designs in the paper if applicable
Belly Band 10 x 1
2 circles cut using Deckles circle dies, larger one in Summer Splash and smaller one in Basic White
Basic White square 2¾ x 2¾ doe the inside
I die cut small flowers in coordinating cardstock using the Flowers of Beauty dies\
Stamps Simply Said
Inks Summer Splash and Pretty Peacock
In-Colour Shimmer Gems
Tear & Tape
Tombow Mono Liquid Glue


Raised Front General & Festive Friday (YouTube tutorial available)


Raised Front Cards

Check out the YouTube Tutorial here

Main body 8½ x 5½, scored at 4¼
Front layer 3 x 4
DSP 2" tall by 3" for the front and enough to tuck under the sides. 
I used 6 x 2 on the Christmas card, cut 3" to go on the front and each side has 1½"

Main body Highland Heather
Layer Petal Pink
DSP Thoughtful Journey
Flower fussy cut from Delightful Floral DSP
Greeting from Best Friends
Ink Pretty Peacock
Iridescent Rhinestones
Dimensionals

Main body Real Red
Embossed with the Plaid 3D Embossing Folder
Due to the raised nature of the embossed piece, the DSP was attached with Tombow Mono Liquid Glue
Layer Basic White
DSP Take a Bow
Christmas die cut from Peaceful Season using Real Red & Basic White
Happy Stamped with Peaceful Seasons
Ink Real Red
Red and White Peppermint embellishment
Dimensionals

Double Flip Split Front Otter Card (YouTube tutorial available)


Double Flip Split Front Otter Card

Check out the YouTube Tutorial here

Main body Lost Lagoon 8½ x 5½, scored at 4¼. Cut down from the score line at 1¼" on each side
Pool Party 2 pieces 4⅛ x 1⅛ and one piece 4⅛ x 2⅞ and circle using Deckled Circle dies
DSP 4 x 4⅜ Cut ⅞ in each side so you end up with a thin strip, a wide middle and another thin strip so the design flows across the card front
Basic White for inside 5¼ x 4
Small strip of Lost Lagoon 5½ x 
Add a small strip of DSP (Pebbles) It won't make it all the way across so make sure the joint is under the circle
Attach the strip to the 2 outside panels ONLY
Add greeting with Dimensionals

3 Bar Interlocking Gate Fold (YouTube tutorial available)


3 Bar Interlocking Gate Fold

Check out the YouTube Tutorial here

Main body Smokey Slate 8½ x 5½, scored at 2⅛. Fold the opposite side over and butt it up against the folded area to ensure the 2 sides meet evenly.
Bigger layers 4⅛ x 1¾, two in Basic White, one in Misty Moonlight
Smaller layers 4 x 1⅝, two in Iconic Celebrations DSP, one in Basic White
Circles Misty Moonlight 2¼", Basic White 2"
Stamp Snowflake and die cut out
Cover the entire flake with Wink of Stella
Greeting stamped in Misty Moonlight
Stamps and dies One of a Kind 
Basic Rhinestones
Tear & Tape and Tombow Mono Liquid Glue recommended
Dimensionals

The DSP layers adhere to the left side
The greeting adheres to the right side

2468 Trifold Card (YouTube tutorial available)


2468 Trifold Card

Check out the YouTube Tutorial here

Main body Summer Splash 4¼ x 5½
DSP Unbounded Beauty 5¼ x 12, scored at 2, 4, 6 & 8
Glue panels 1 to 2 and 3 to 4
Basic White inside layer 3½ x 4¾
Die cut the rectangle for the greeting and stamps with Simply Said Just a Note
Stamp the 3 flowers, and leaves from the Happy Hibiscus set and die cut
Circles 2½ punches in Summer Splash and 2¼ punches in Basic White
Die cut leaves from Summer Splash cardstock
Arrange flowers into the circles.
Circle one goes on the front layer, circle 2 goes on the middle layer and the stamps leaves and small flower go on the inside layer
In-colour Shimmer Gems


Nests of Christmas October 2024 Paper Pumpkin Alternatives #1 (YouTube tutorial available)


Nests of Christmas October 2024 Paper Pumpkin Alternatives #1 

Check out the YouTube Tutorial here      

These cards were made using 2 cards from the kit with a few added ingredients.


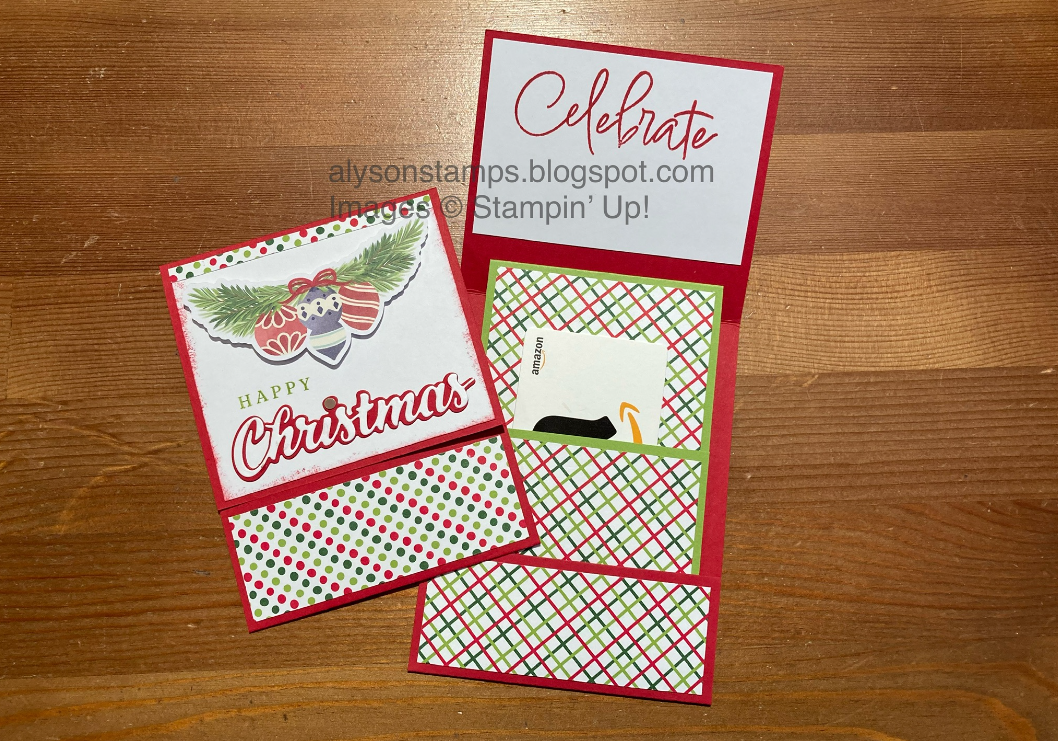
Cut the arched section off the card then rotate it so the blue is at the right
Score the light green section at 2  and fold back on itself in a Z Fold style
Add the punched out rectangle section from card 2
Add the die cut pieces as shown using dimensionals. The greenery is slightly fussy cut to remove the red berries for another card
Ink Real Red


Push the arch out of the middle and save for another card
Cut this section down from 4½ x 5½ to 4 x 5¼
Basic White cut slightly smaller at 3⅞ x 5
Stamp the greeting directly onto the white background and greenery around the edges
The main body of the card is Blueberry Bushel 8½ x 5½, scored at 4¼
Add the arched piece to the front with dimensionals
The bird is one of the die cut pieces and the red berries that were fussy cut off the pieces used in alternative card 1 is added
Ink Real Red and Shaded Spruce


Main body Blueberry Bushel 8½ x 5½. As this is a gate fold card, score one side at 2⅛ then fold the other side by hand and butt it up against the first folded side - that ensures a better fit.
Cut the arch saved from card 2 and cut it in half at 1⅝ and add each section to the 2 gate folds
The bird is from Nests of Winter DSP, cut using the Winterly Tree Tops dies
The greenery is one of the die cut pieces from the kit
The banner is only stuck to the right hand gate fold section
Ink Real Red


Main body Blueberry Bushel 8½ x 5½, scored at 4¼
The green rectangle is cut from card 2. The middle was used for the Z fold card in alternative #1
The edges are stamps with the greenery stamp
The grosgrain ribbon is stuck behind the greeting banner
The pieces are added using dimensionals
Ink Real Red and Shaded Spruce


Main body Shaded Spruce 8½ x 5½, scored at 4¼
Add the shimmery blue section from the 2nd card out of the kit.  
This was layered down to 5⅝ x 4 so as much of the shimmer was left showing
The greenery to the right of the bird was fussy cut from one of the envelopes and both pieces are added with dimensionals
The banner was cut from Basic White using Stylish Shapes
Ink Real Red


Trifold Nests of Winter Festive Friday (YouTube tutorial available)


Trifold Nests of Winter Festive Friday

Check out the YouTube Tutorial here

Main body Shaded Spruce/Real Red 5½ x 4¼
Crumb Cake 5¼ x 4, embossed with Woodland Textured Embossing Folder
Inside layer 3 x 1¾, greeting layer ½" piece banner cut at each end
Early Espresso layer 4¼ x 3¼ - circle die cut using Stylish Shapes
DSP Nests of Winter 12 x 3, scored at 4 & 8
Birds and other elements fussy-cut
Stamps Peaceful Season
Ink Real Red
Tombow Mono Liquid Glue
Dimensionals

Triple Easel Card (YouTube tutorial available)


Triple Easel Card

Check out the YouTube Tutorial here

Base Basic White 5 x 4
Big Layer can be either 4 x 12, scored at 4, 6, & 8 or 2 separate pieces 4 x 8, scored at 2 & 4 and a separate 4x4 piece attached
Middle Layer 3 x 9, scored at 3, 4½ * 6
Small layer 2 x 6, scored at 2, 3 & 4
Summer Splash 1 x 4

DSP Unbounded Beauty
2 pieces 4 x 4
2 pieces 3 x 3
1 piece 2 x 2

Greeting pieces stamped and cut from a scrap ½" wide

Stamps Flowers of Beauty
Inks Peach Pie, Petunia Pop and Summer Splash